-
Accounting Dashboard
-
General Accounting Set up
-
Chart of Accounts
-
Day to Day Transactions
-
Sales
-
Banks & Bank Reconciliations
-
Fixed Assets
-
Year/Month End
-
Reports
-
Purchase Order approval
-
POS
-
Purchasing
-
Non stock purchasing
-
Expense Module
-
Shopify Sales
-
Invoice Reminders
-
Customer Statements
-
Tax
-
Supplier Batch Payment
-
Product Categories
-
Inventory Valuation Journals
-
Analytic Accounts
How to update Settings for Customer Statements
Following are the general settings you need to know before starting the process.
1. Automate the customer statement
i) Go to Settings Module>> Accounting >> Customer Invoices
ii) Check on send customer statement box
2. Email to be send to invoice contact
- Go to contacts> Select the Customer> ADD

- Tick the Invoice address>> update the email address and other details(if required) >> Click Save & Close

Please note if a customer is not configured with an invoice contact, statement will be sent out to the main email address.
3. Opt in/out customers, while sending customer statements automatically
i) Go to Contacts Module >> Select the customer
- To automatically send customer statement uncheck Opt out statement field
- To disable sending customer statement automatically check Opt out Statement field
4. Setting up a Minimum amount for customer statements going out, while it is automated.
Go to Settings Module>> Accounting >> Customer Invoices
Here you can provide the minimum amount and click SAVE 
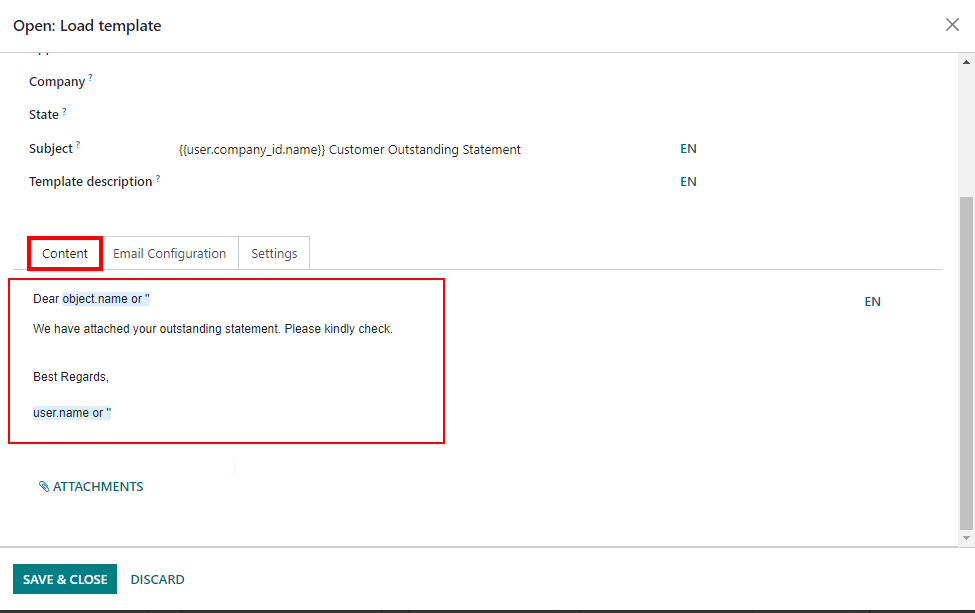
5. Editing the email template
i) Go to contacts Module>> select a customer>> click outstanding statements tab
ii) Click send outstanding statements
iii) Click on the arrow mark at the corner of OPC- Customer Outstanding Statement. 
iv) Here, under the content you can update the the template. (Please make sure not to edit the words which has the blue color background. 
v) Click Save & Close
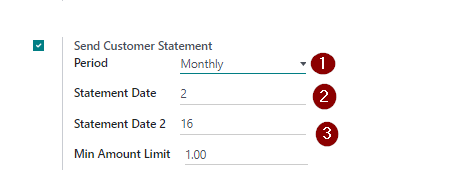
6. Updating the Customer statement sending date
i) Go to Settings Module>> Accounting >> Customer Invoices
ii) Under the send customer statement,

1) Select the period
All - can be weekly/ monthly
Weekly - will be weekly
Monthly- will be monthly
2) 1st statement sending date
3) 2nd statement sending date (if your sending a 2nd statement in the same period which you have selected above)
7. Update the template details of Customer Statement
i) Go to Settings Module> Users & Companies> Companies
ii) Select the company
iii) Click over the contact under the General information tab
iv) Here you can update the fields which are relevant to the template
v) If you need to update the bank account number, Go to the Accounting tab & update the account number
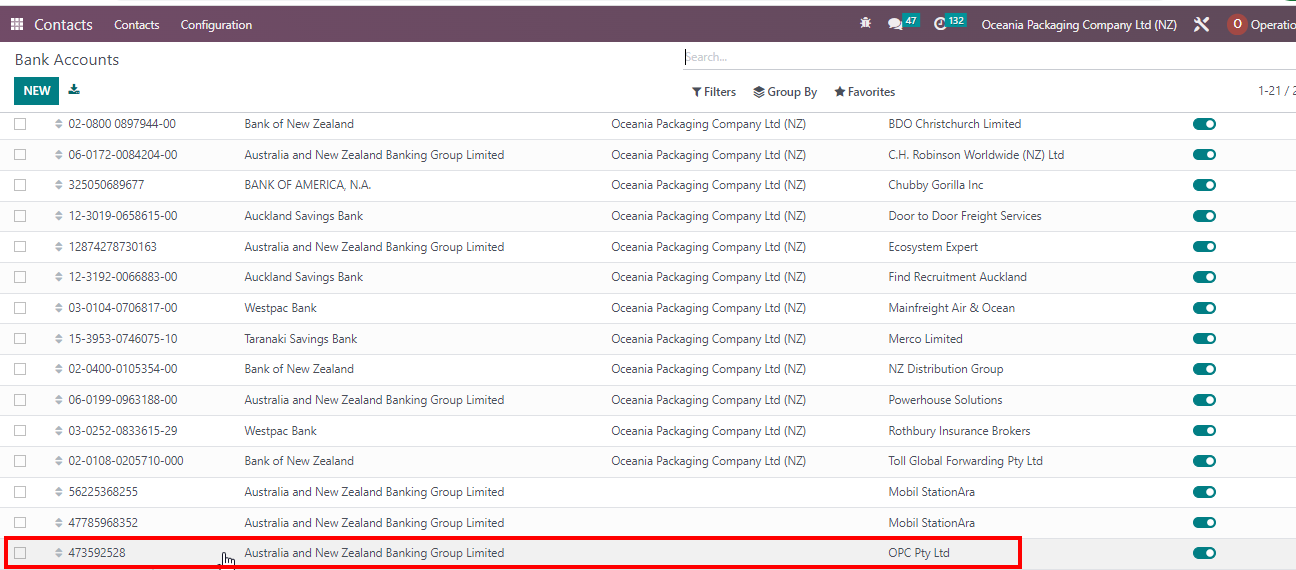
vi) If your in an Australian company, you have to follow the below steps to update the bank account number
A) Go to Contacts Module> Configuration> Bank Accounts
B) Click on the relevant AU bank account
C) Here, you have to provide the account number & BSB number separately (template will catch both numbers and create the full account number)
| Views | |
|---|---|
| 254 | Total Views |
| 1 | Members Views |
| 253 | Public Views |